Overview
Sardana is the control program initially developed at ALBA. Our mission statement:
Produce a modular, high performance, robust, and generic user environment for control applications in large and small installations. Make Sardana the generic user environment distributed in the Tango project and the standard basis of collaborations in control.
Up to now, control applications in large installations have been notoriously difficult to share. Inspired by the success of the Tango collaboration, ALBA decided to start the creation of a generic tool to enlarge the scope of the Tango project to include a standard client program - or better a standard generic user environment. From the beginning our aim has been to involve others in this process. At this moment in time the user environment consists of a highly configurable standard graphical user interface, a standard command line interface understanding SPEC commands, and a standard way to compose new applications either by programming or with a graphical tool. It further consists of a standard macro executer, standard set of macros, a standard range of common hardware types (like motors, counters, cameras and so on) and a configuration editor to set all this up. The origin of the Sardana name comes from a Catalan dance to honor the region where the ALBA synchrotron is build. The toolkit to build Sardana has been C++, Python, Qt and Tango. If you like the tools you will love Sardana.
What do we “sell” to our users
Let’s start our excursion into the Sardana world by a word of caution. We will talk a lot about technical possibilities and implementation details. Our users will judge us on the ease of use of the final GUI, its robustness and the features it offers. There are millions of ways to arrive at this end result. Our claim is however that by doing it the Sardana way and developing the application out of lego components in a collaborative environment we will arrive at higher quality software with much higher efficiency.
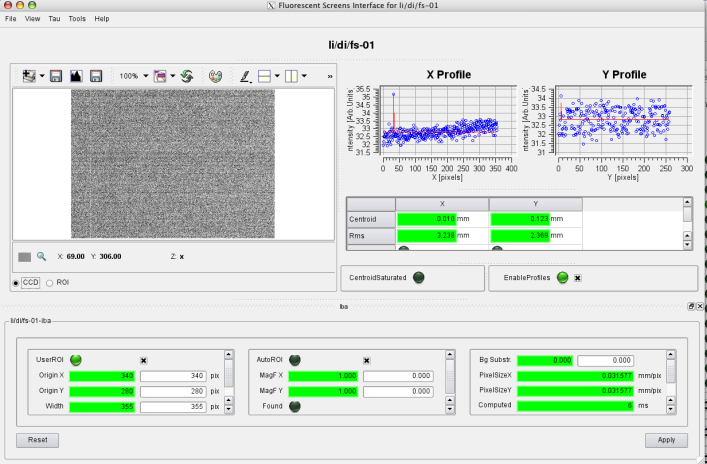
The following screen shot of an early prototype of a specific beamline application should serve as a reminder of this final goal.
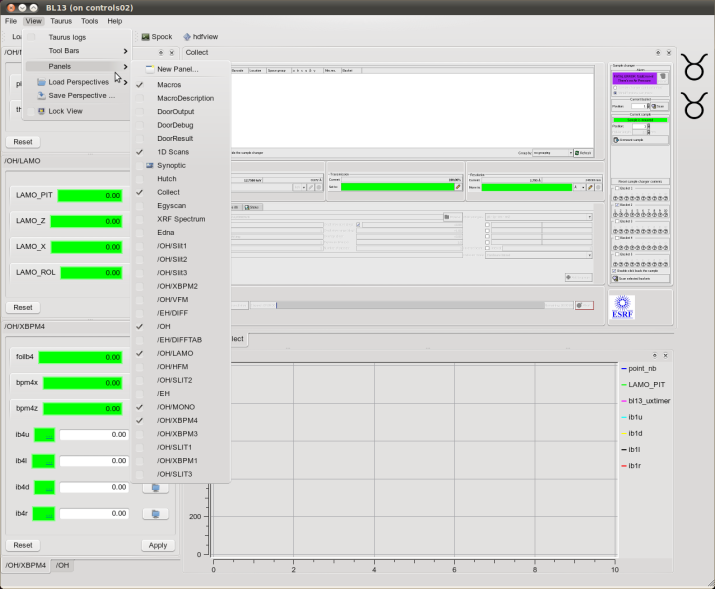
Inside this application we have many features common to other beamline control applications or to some accelerator applications. The following screen shot shows such a standard application which has been done without programming - just by configuring the application. This illustrates one of the design guidelines in Sardana: Always provide a generic interface which can be specialized for an application.
Starting a procedure
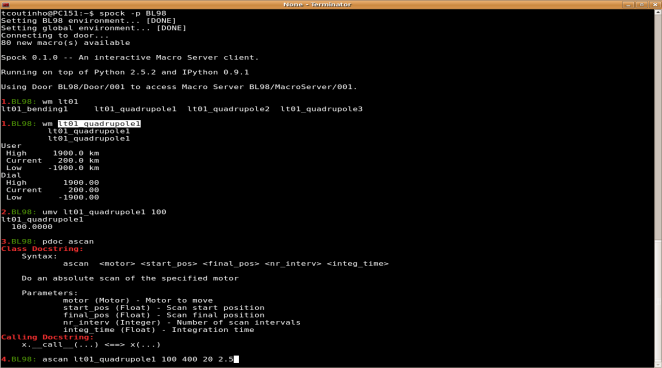
At the heart of the Sardana system are standard reusable procedures. From past experiences, the importance of standard procedures has been realized and has influenced most of the major design decisions. To illustrate this point, please let me walk you through different ways how to start such a procedure without going into too many details. You might want to think of a scan as an example. One way of starting a procedure is with a command line interface. Users familiar with SPEC will immediately recognize this way. In effect, inside Sardana most of the standard SPEC commands (including many diffractometer geometries thanks to Frédéric Picca from the SOLEIL synchrotron) are provided as standard procedures and can be invoked in the same way.
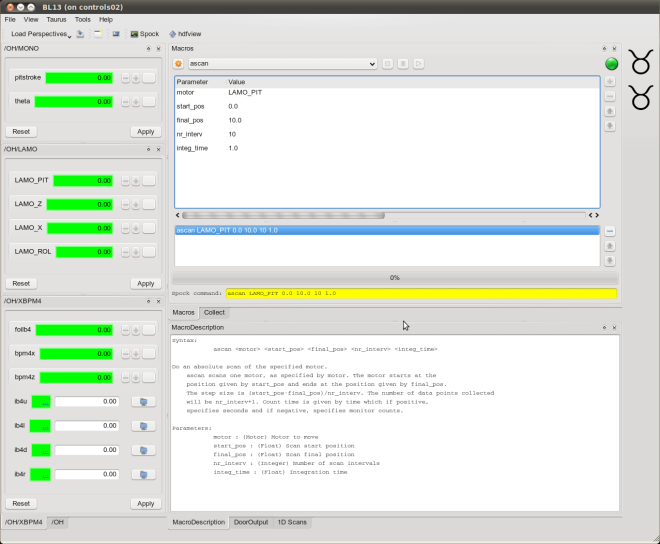
Every procedure can also be started from a GUI. This does not need any programming or configuration from the user of the system. When a new procedure is created, it is automatically visible inside the GUI and command line tools.
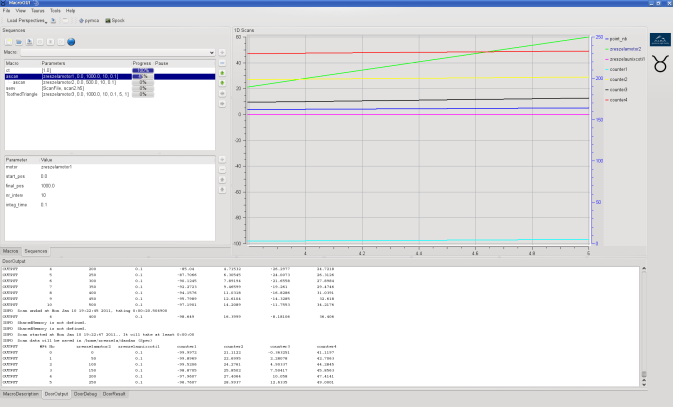
This GUI interface will mainly be used for procedures which are rarely used and where a specialized interface has not yet been developed. An example of how to use the same procedure in order to carry out energy spread and emittance measurements is presented in the following picture.
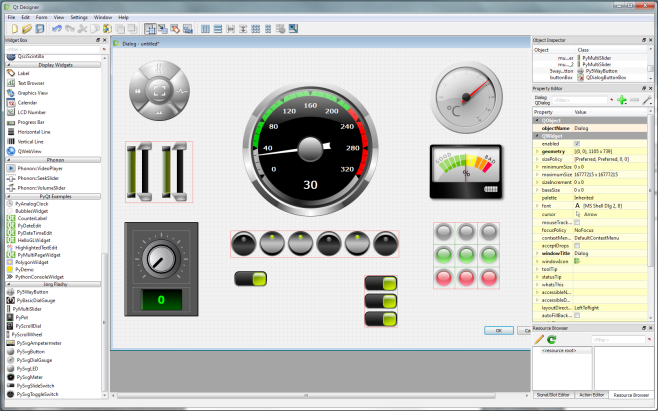
The standard Qt designer can be used to create new graphical elements (widgets) and connect them to the system for even greater flexibility. The following screen shot shows the standard qt designer with some fancy widgets developed in house.
Taurus as a toolkit for applications
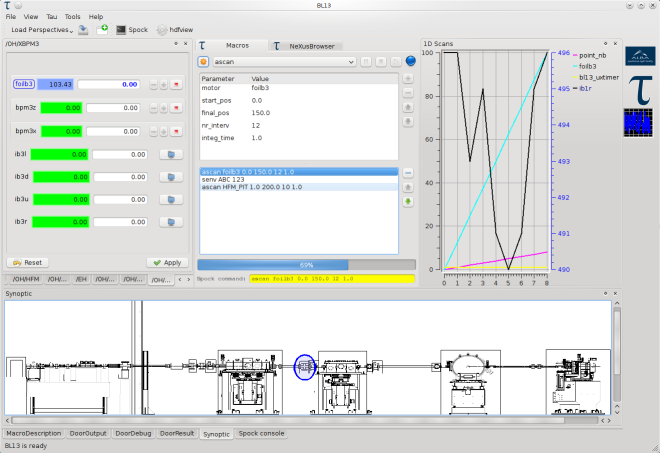
The GUI toolkit for Sardana is called Taurus. The graphical user interfaces in this paper have been created with this toolkit. It can be used in conjunction or independent from the rest of the system. It can be used to create custom panels inside the generic GUI or to create stand alone applications. Again, this approach of take what you need has been implemented to foster the widest range of collaborations. Almost all applications in the ALBA machine control system have been created with this toolkit. Creating the applications out of standard components has been proven to be extremely powerful. In the Graphical user interface screen shots chapter you can see some of the graphical user interfaces used.
How to write your own procedure
Another example I would like to look into is how to write your own procedure. The simplest possible way is to use an editor to assemble commands and execute them. This batch files type of procedures are useful to automatically run procedures over night and for similar simple applications. The following screen shots show the procedure executer with this feature enabled.
To go further I would like to explain some internal details. All procedures are executed in a central place (called the macro server). There can be more than one macro server per system but for the following I assume the common case of a unique macro server. This macro server holds all the general procedures centrally. It provides a controlled environment for these procedures. They can be edited, run, debugged under its supervision. This allows for example to automatically roll back changes made in case of problems, log access and grant permissions. The procedures executed in the macro server provided by the current Sardana system are Python functions or classes. Writing a procedure as a function is more straightforward and recommended for the beginners. Writing it is a class is a way to group the different methods which concerns this procedure. As an example, in some procedures it could be possible to do very specific things in case the user orders an emergency abort of the procedure. The following example shows the procedure to move a motor.
from sardana.macroserver.macro import macro, Type

@macro([ ["moveable", Type.Moveable, None, "moveable to move"],
         ["position", Type.Float, None, "absolute position"] ])
def move(self, moveable, position):
    """This macro moves a moveable to the specified position"""
    moveable.move(position)
    self.output("%s is now at %s", moveable.getName(), moveable.getPosition())
As you can see in the example, the procedure must be documented and the input parameters described. From this information, the graphical user interface is constructed. It is also possible now to start the procedure from the command line interface and use the tab key to automatically complete the input. The actual action is actually carried out in the run method. The motor movement is started and the procedure waits until it arrives at its destiny. The Python classes should stay small and very simple. All complicated code can be put into modules and tested separately from the system.
How to adapt it to your own hardware
As the system has been thought from the beginning to be used at different institutes, no assumptions of the hardware used could be made. There exists therefore a mechanism to adapt the Sardana system to your own hardware. This adaptor also has another very important role to play. This is best explained with the motor as example. We consider more or less everything which can be changed in the system as a motor. The term which should have better been used to describe this thing should have been therefore movable. A motor can be a temperature of a temperature controller which can be changed, a motor from an insertion device which needs a highly complicated protocol to be moved, or just about anything. Sometimes we also consider calculated value like H,K,L, the height of a table, and the gap of a slit to be a motor. All these different motors can be scanned with the same generic procedures without having to worry about on which elements it is working on. You can add one of these pseudo motors by means of configuration. It is easily possible to add new types of pseudo motors. This has only to be done once and the Sardana system already provides a large variety of these types.
Please find in the following an example for adding a completely new type in the case of a slit.
The actual information how to create a motor of type slit is kept in the two methods calc_physical and calc_pseudo which can be used to do the transformation between the different coordinate systems. Or to say it in the language of Sardana between the pseudo motors gap and offset and the real motors left blade and right blade.
Once again the information in the beginning allows the graphical user interface to be created automatically once it is loaded into the system.
Symbolic Sketch
I would like to end this summary with a symbolic sketch of the different subsystems in Sardana.
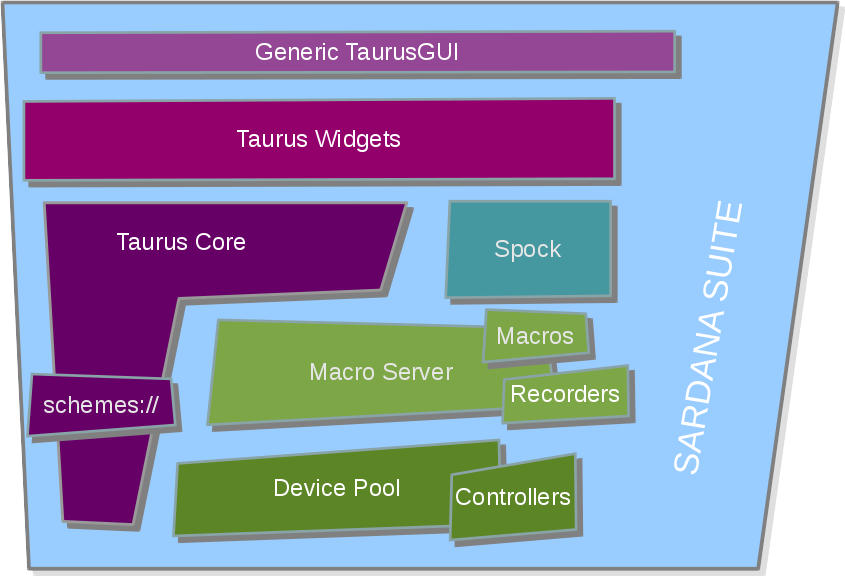
The user will normally not be concerned with these implementation details. It is presented here to allow appreciating the modularity of the system.