Sardana configuration
There are many configuration points in Sardana and unfortunately there is no single configuration application neither interface to access all of them yet.
Note
At the time of writing, Sardana system can run only as Tango device server and most of the configurations are stored in the Tango database (Tango DB). One can easily change them with the Jive client application, but it is highly recommended to use the Sardana configuration tools instead.
Configuration format and tools
The Sardana 3.4.0 version including SEP20
introduced a configuration text format based on YAML
(see sar_demo.yaml example),
and a set of CLI tools for configuring Sardana systems (check sardanactl config --help
to list all of them). In the future we plan to merge all the others configuration interfaces
into this format in order to provide a single point of configuration.
In sardana 3.6.0, the sardana.config module was moved to its own repository.
Make sure to install the sardana-config package (from PyPI or conda-forge).
It is important to know that the Sardana config tools work “offline”,
acting directly upon the Tango DB without requiring a running Sardana instance.
This means it can be used to set up a Sardana installation from scratch.
However this also means that it can not modify the state of the running
Sardana instance without restarting it or running
the reconfig macro afterwards.
This video shows a short demonstration on how to use it.
In the following sketch you can see the main actions provided by these tools:
        flowchart TD
    DB[(Tango DB)] -->|dump| YAML("Sardana config (YAML)")
    YAML -->|load| DB
    YAML---|validate|YAML
    YAML2("Old Sardana config (YAML)")
    YAML---|diff|YAML2
    YAML---|update|YAML2
    style YAML2 stroke-dasharray: 5 5
Sardana CLI configuration tools
In order to be ergonomic when it comes to comparing versions etc, the tools are written to enable “roundtripping” as far as reasonably possible. This means that converting e.g. from Tango DB -> YAML -> Tango DB again should result in a Sardana system that is functionally identical to the original. The idea is to make actual changes easy to detect. Perfect roundtripping of TANGO DB -> YAML -> TANGO DB may not always be possible, due to Tango’s handling of properties as strings, case insensitivity, or number formats among other things.
Loading a YAML config and dumping it does not persist things like key ordering and YAML comments, but only “logical” content. Take a look at the update command for a solution to this. It is helpful for example if you want to keep your YAML file as a human readable main config file with comments, etc.
For the most part, the commands read from files, and write to stdout. Therefore
in order to write the results to files, use shell redirection (see examples
below). It is also possible to substitute filenames with - which means the
command expects to read from stdin. This enables piping the output of one
command into another, useful for scripting.
Here follows a brief explanation of the commands available, with examples. Use
the --help option to get more details about each command.
dump
This command “dumps” a Sardana system stored in the Tango DB into a Sardana YAML configuration text. You must provide the device name of the macro server, if there is more than one.
Warning
The dump command attempts to parse and format your database content (such as property and attribute values) into YAML. If these values are not JSON-compatible, they will be dumped as strings. However, in certain edge cases, the parser might make assumptions that result in slight modifications of the original data.
To avoid such issues, we strongly recommend using JSON-compatible formats for all attributes and properties. For example, instead of using an arbitrary format for a list like "1 2 3 4", use a proper JSON array: "[1, 2, 3, 4]".
This command is useful when starting out using sardanactl config with an existing
system, but also later, if you want to update your YAML config with changes made
manually in the Sardana system. Also see the update command.
It can also be used to make a “snapshot” of the current configuration, to be compared or restored later.
Example:
sardanactl config dump macroserver/demo1/1 > my_config.yaml
load
Does the opposite of dump; takes a Sardana YAML configuration and loads it
into a Tango DB. It also prints out information about the changes required to
bring the DB to the desired state. By default, this script runs in dry run
mode, meaning that it does not actually change the Tango DB, but just simulates
and reports what would change.
Note
You are recommended to inspect the output from the dry run before proceeding, to prevent unexpected changes.
Use --write option to really change the Tango DB.
Example:
sardanactl config load my_config.yaml  # dry run
sardanactl config load --write my_config.yaml
validate
Reads a Sardana YAML configuration and checks that it is properly formatted.
By default, this command makes a syntactic check only. Use --check-code to enable
validation against the plugins code, which means that it must be run in
a sardana environment that has all used controllers installed.
The script is then able to do more sophisticated checks.
If problems are found, the script fails and some errors should be displayed to help fixing the problems.
Note that the ‘load’ command also automatically validates the provided config file before applying it. This command is mainly useful for “offline” checking.
Example:
sardanactl config validate my_config.yaml  # syntactic check
sardanactl config validate --check-code my_config.yaml  # full check
diff
Reads two Sardana YAML configurations and produces a list of what has changed from the first to the second one. This can be useful when looking for differences between e.g. two snapshots taken at different times. The output is intended mainly to be human readable.
Note: this is equivalent to what the load command does in dry-run mode, but can
be performed “offline”.
Example:
sardanactl config diff my_config.yaml my_config_update.yaml

Pool: demo1
- REPLACE /pools/demo1/controllers/slitctrl01/physical_roles/sl2b mot02 => mot03
- REMOVE /pools/demo1/measurement_groups/mntgrp01/channels/3
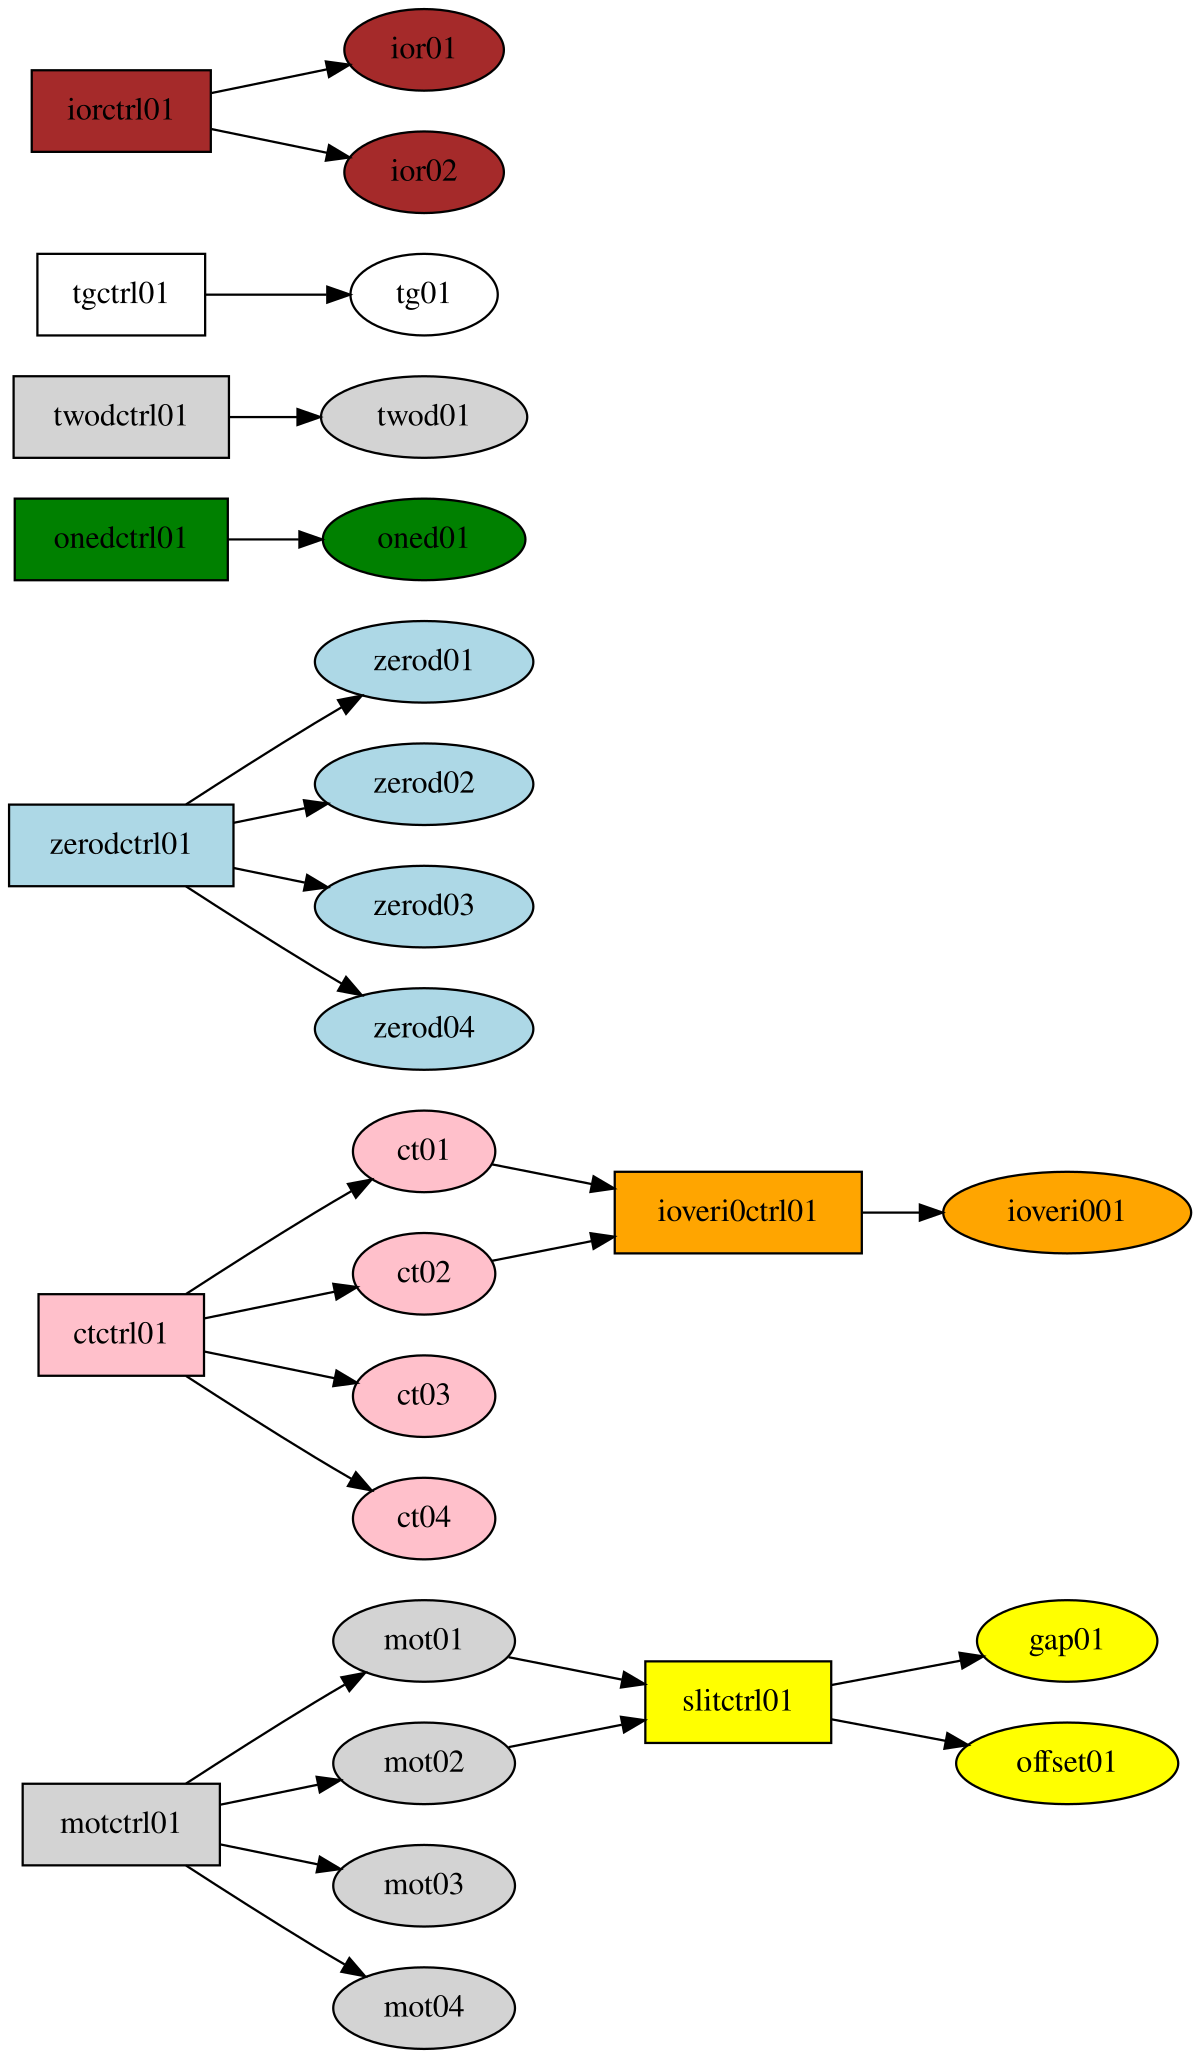
graph
Create a directed graph of all controllers and elements in a pool. The lower level elements are located on the left side of the graph and the hiher level ones on the right side. Launching the following command:
sardanactl config graph --config sar_demo.yaml
will generate the graph of the first pool of the given config file. The resulting graph will look like this:
If no config file is specified, the configuration will be taken from the local control system.
Other command options allow the selection of the pool, selection of specific elements to be included
in the graph, or the output format. Check all options with the --help argument.
update
(Note: this is a complex feature, we’ll see how well it works in practice.)
One benefit of the YAML format is that it allows inline comments. However since we cannot store these in the Tango DB, they will be lost in the conversion. Also, the ordering of keys in the file will not persist when converting to Tango DB and back.
The update command provides a solution to this problem. The idea is that a
YAML file that contains ordering and comments can be updated with the current
state of the installation, without losing the “human” information.
Let’s say you have a my_config.yaml where you have organized things nice and commented.
Now create an my_config_dump.yaml from a dump of the same Sardana installation
and then run the script like this:
sardanactl config update my_config.yaml my_config_dump.yaml > my_config_updated.yaml
Now my_config_updated.yaml should contain the new config, but
keeping your comments and ordering from the original (as far as possible).
Another point is that this should make the commit diffs more readable if you intend
to manage the config with e.g. git. However, if you don’t care about comments and
ordering, it is probably better to rely on the diff command above.
Multiple config files
Sometimes it can be useful to split the YAML configuration file into several smaller ones. For example, you may be generating configuration files from several sources. Or, you have several different configurations and want to reuse parts of it.
This can be done with the include tag. Your main YAML config file might contain:
Example:
my_controller: !include "ctrls/my_controller.yaml"
When reading this config, sardanactl config will automatically read the configuration for my_controller from the given file, whose path is relative to the “parent” configuration file, and insert it into the resulting configuration. The file ctrls/my_controller.yaml might contain:
Example:
type: Motor
python_module: "mycontroller.py"
python_class: MyController
...
Any part of the configuration file may use include, not just controllers. It
is, however, not currently possible to include multiple files with one
include tag. This means, for example, that you either put all controllers in
one file, or each controller in its own file.
External files may also contain include tags. This way it’s possible to
maintain the configuration as a “tree” of files, where each file can be
independently managed.
However, when using update on a configuration with
multiple files (for example, to update it with the output from
dump), it’s not possible to use the default method,
where the new YAML is written to stdout. That would write out only the main YAML
file, removing any include tags and “flattening” the structure. Instead, you
need to use the --inplace flag:
Example:
sardanactl config update original_multi.yaml dump.yaml --inplace
Note
This will overwrite your original_multi.yaml as well as any of the
included files that need updating. So make sure you save the originals, or
use a code management tool like git, to make sure you don’t lose
information.
Configuration points
This guide goes step-by-step through the Sardana system configuration process and lists all of the configuration points linking to documents with more detailed explanation. It starts from configuration of the Spock client, going through the MacroServer and finally ending on the Device Pool.
This chapter will not document itself all the different configuration possibilities and will just link you to other documents explaining them in details.